
Open WRT installing Wireguard VPN client on LEDE 17.01.1

Google Gemini said:
Installing and configuring WireGuard VPN client on LEDE 17.01.1This guide will walk you through the process of installing and configuring WireGuard VPN client on a device running LEDE 17.01.1, also known as OpenWrt 17.01. 1. Access your router and install necessary packages
- Connect to your OpenWrt/LEDE router (e.g., via SSH or through its LuCI web interface at http://192.168.1.1).
- Update the package lists by running
opkg updatein the SSH terminal, or by navigating to System > Software > Update lists in the LuCI web interface.wireguard-toolskmod-wireguardluci-proto-wireguard- (Optional, for QR code generation)
qrencode
- Reboot your router after installation for the changes to take effect.
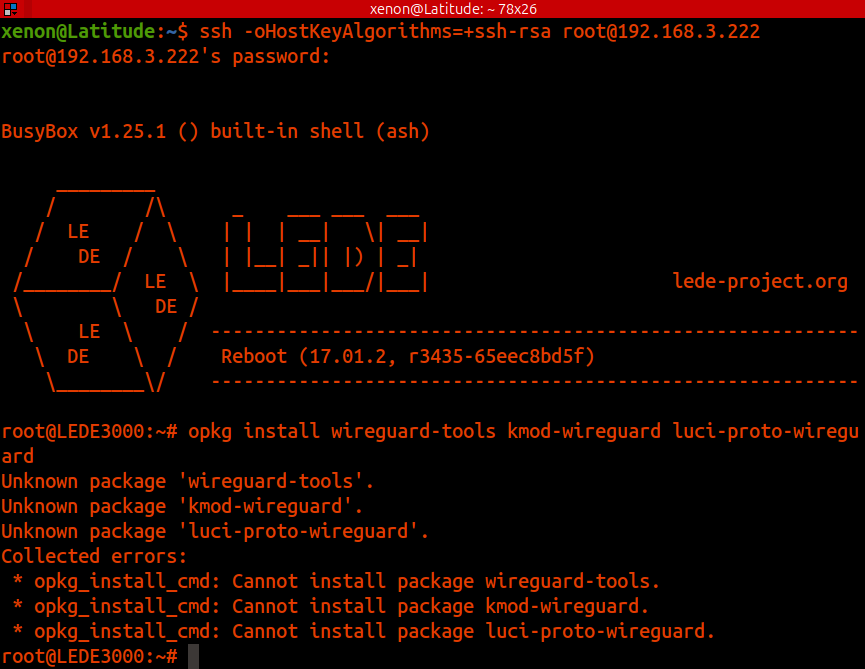
Install the necessary WireGuard packages:You can install these packages via SSH by running:bash
opkg install wireguard-tools kmod-wireguard luci-proto-wireguard
Alternatively, in LuCI, search for each package individually under System > Software and click Install.
2. Obtain WireGuard configuration file
- Generate a WireGuard configuration file (.conf) from your VPN provider, selecting "Linux" or "OpenWrt" as the device platform.
- Download and open the generated configuration file with a text editor (e.g., Notepad, TextEdit).
- Copy the content of the file, specifically focusing on the
[Interface]and[Peer]sections.
3. Create and configure WireGuard interface
- In your router's LuCI web interface, go to Network > Interfaces and click Add New Interface.
- Name the new interface (e.g., "VPN").
- Select WireGuard VPN as the Protocol of new interface and click Submit / Create Interface.
- In the General Setup tab:
- Click on Load configuration and paste the content of your WireGuard configuration file copied earlier.
- Click Import settings.
- In the Advanced Settings tab:
- Set MTU to 1412 (or as specified by your VPN provider).
- In the Peers tab:
- Edit the imported peer configuration.
- Check the Route Allowed IPs option.
- Set Persistent Keep Alive to 25.
- Click Save.
- Click Save & Apply to apply the interface configuration.
4. Configure firewall rules
- Go to Network > Firewall in LuCI.
- Click the Add button to create a new firewall zone for your VPN.
- Name the zone (e.g., "vpn_zone").
- Set Input to "Reject".
- Set Output to "Accept".
- Set Forward to "Reject".
- Check Masquerading.
- Check MSS Clamping.
- Under Covered networks, select the VPN interface you created (e.g., "VPN").
- Under Allow forward from source zones, select "lan".
- Click Save.
- Go back to the list of firewall zones and click Edit next to the "lan" zone.
- Under Allow forward to destination zones, select your VPN zone and deselect WAN to prevent potential DNS leaks.
- Click Save.
- Click Save & Apply to implement the firewall changes.
5. Prevent DNS leaks
- Navigate to Network > Interfaces in LuCI.
- Click Edit next to the "lan" interface.
- Under General Settings, find Use custom DNS servers and enter the DNS servers provided by your VPN service or a public DNS server (e.g., 46.227.67.134 and 192.165.9.158 for OVPN).
- Click Save.
- Click Save & Apply.
6. Reboot and verify connection
- Reboot your router by navigating to System > Reboot > Perform Reboot or by running
rebootin the SSH terminal. - After the router reboots, check the WireGuard status under Status > WireGuard in LuCI to ensure the VPN tunnel is established and traffic is flowing.
You can also use tools like ipleak.net or dnsleaktest.com to verify your IP address and DNS servers are routed through the VPN. Note: The specific settings and steps may vary slightly depending on your VPN provider and its WireGuard configuration.
You said:
Can you summarize this?
Google Gemini said:
Installing WireGuard VPN client on LEDE 17.01.1Prerequisites
- A LEDE 17.01.1 router or device.
- WireGuard server configuration details (private key, public key, endpoint address, endpoint port, allowed IPs).
- An active internet connection on the LEDE device.
Steps
- Access the LEDE interface: Log in to your LEDE router's web interface (LuCI) via a browser (typically at http://192.168.1.1 or a custom IP).
- Install necessary packages: Navigate to System → Software and click "Update lists" to refresh available packages. Then, in the filter field, search for and install:
wireguard-toolskmod-wireguardluci-proto-wireguard
- Create a WireGuard interface: Go to Network → Interfaces and click "Add new interface".
- Give it a descriptive name (e.g., "myvpn").
- Set the "Protocol of the new interface" to "WireGuard VPN".
- Click "Create interface".
- Configure the interface:
- In the "General Settings" tab, provide the "Private Key" obtained from your WireGuard server and the "IP addresses" assigned to your client interface. You can leave the "Listen Port" and "MTU" at their default values unless specified otherwise by your VPN provider.
- If using a pre-configured file, click the "Load configuration..." button and paste the contents of your WireGuard configuration file, then click "Import settings".
- In the "Peers" tab, click "Add Peer".
- Enter a description for the peer.
- Provide the "Public Key" of the WireGuard server.
- Specify the "Endpoint Host" (IP address or hostname of the WireGuard server) and "Endpoint Port" (e.g., 51820).
- Enter the "Allowed IPs" (e.g.,
0.0.0.0/0for routing all traffic through the VPN, or specific subnets for split tunneling). Check "Route Allowed IPs". - Set "Persistent Keep Alive" to
25(recommended, especially if your router is behind NAT). - Click "Save".
- Click "Save & Apply" on the interface configuration page.
- Configure the firewall: Navigate to Network → Firewall.
- Click "Add" to create a new firewall zone for the VPN interface.
- Give it a name (e.g., "vpn_zone").
- Set "Input" to "Reject", "Output" to "Accept", and "Forward" to "Reject".
- Check "Masquerading" and "MSS clamping".
- Select the WireGuard interface (e.g., "myvpn") from "Covered networks".
- In "Allow forward from source zones", select "lan" to enable devices on your LAN to use the VPN.
- Click "Save".
- Edit the "lan" zone and ensure that "Allow forward to destination zones" includes the "vpn_zone" and excludes "wan" to prevent leaks.
- Prevent DNS leaks (optional): Navigate to Network → Interfaces, edit the "lan" interface, and under "General Settings", ensure that "Use custom DNS servers" is unchecked and that the VPN's DNS servers are used if you want all DNS traffic to go through the tunnel.
- Reboot: Go to System → Reboot and click "Perform reboot" to apply the changes and establish the WireGuard connection.
- Verify connection (optional): Check the status of the WireGuard interface and confirm that traffic is flowing through the VPN.
Note: The exact steps and interface elements might slightly differ based on your specific LEDE version and themes.